
When it comes to Client Experience, one of the most crucial and quick steps you can take to up your professionalism in client communication: creating a professional name@yourdomain.com (or .net/.org/.co you get the picture!) email address that you can use straight from your personal inbox by setting up an alias. I use Gmail and love it, so I am going to show you how to do this for Gmail account users.
Just in case you aren’t familiar with the term, an email alias is basically a fancy way of saying you can receive and send emails with your domain address (i.e. name@yourdomain.com) shown to the recipient, when in reality you are actually working from your free personal account (i.e. name@gmail.com).
Why should you care? From a consumer viewpoint, not having a professional email address listed as your point of contact makes your business look more like a hobby than a professional gig. And that fancy website you spent hours upon hours and days and months perfecting? Yeah it doesn’t matter if your potential client is questioning the legitimacy of your business when contacting you to purchase.
Stock Imagery courtesy of SC Stockshop
You can get up both a Gmail account and create an email alias for free and it’s only a couple quick steps to make happen. Oh and you can do this over and over to use as many aliases as you need (think info@yourdomain.com, shop@yourdomain.com, and etc.). So stop what you’re doing and let’s make it happen!
First things first, you’ll need to create your email address for your domain through your domain hosting provider. Once you set up your email address, you’ll need to set up a “forwarder” and direct all emails sent to your gmail account. Since every domain hosting provider is different, I’m not going to walk you through setting up these steps. If you aren’t sure how to do this just contact your specific hosting site to get the steps. I promise I’m not techy by nature and I googled my way through it long ago, so you can do it! If you’re up for suggestions, I HIGHLY recommend using (or switching) your domain host to Bluehost. Their customer service reps have saved my booty on multiple occasions and are ready to walk you through any questions you may have… 24/7. And the best part is that you can create domain email addresses with unlimited storage.
Okay so starting from here, you should have a domain email created through your hosting provider and you have set up a forwarder to your gmail email address. Now we will do the quick steps to make it possible for you to use that email address right in your Gmail inbox.
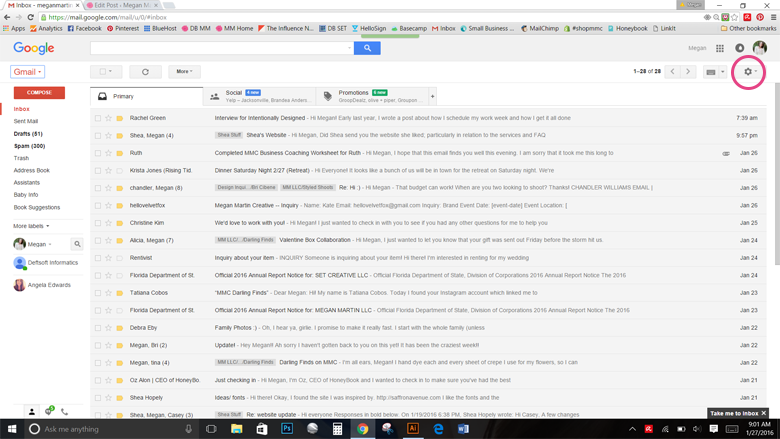
Step 1 – Login in to your Gmail account. In the upper right hand corner, click on the settings button (shown circled in pink below). A drop down box will appear. Click on “Settings.”
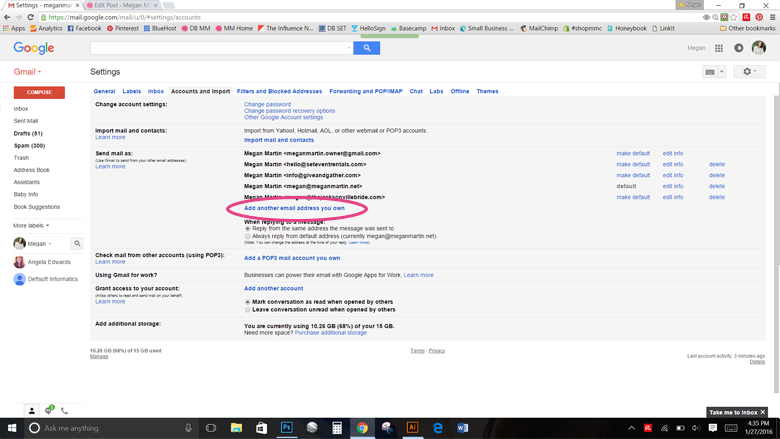
Step 2 – In the settings window, click on the tab “Accounts and Import” at the top. In Accounts and Import, look for “Send Mail as:” (it is the third section from the top) and click on “Add an email address you own.”
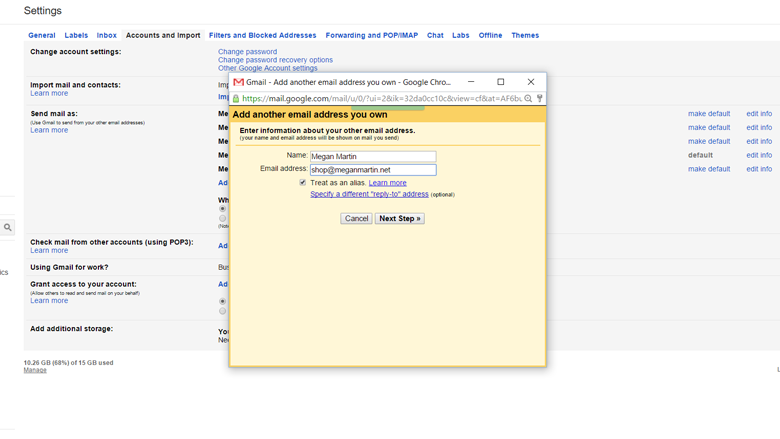
Step 3 – A pop-up will appear to add an email address you own (aka the domain email you set up in your hosting provider!). Set the “Name” to what you want your recipient to see. I just use my name. Set the “Email address” to the exact email address you created with your hosting provider. In my case, I set up “shop@meganmartin.net” *Make sure “Treat as an alias” is checked. Once you have completed these fields, click “Next Step.”
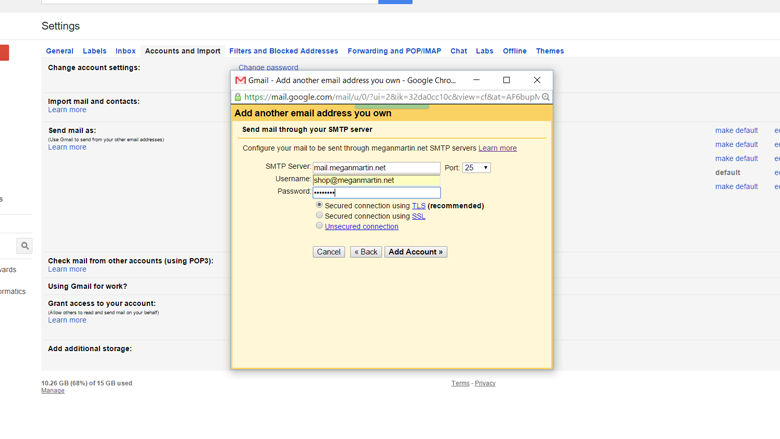
Step 4 – The “SMTP Server” should be “mail.yourdomain.com (or .net/.org/etc).” The “Username” is your full email address. It auto populated just the “shop” part for me so I had to change this. If you don’t properly fill out this line, it will tell you “Authentication Failed.” when you go to add this email address. The “Password” is the same password used to create your email address with your hosting provider.
The “Port” will need to be changed based on what kink of connection you use. If using “TLS” the port needs to be set to 25. If you are using “SSL” the port needs to be set to 465.
Once you have completed these fields, click “Add Account.”
Step 5 – Now that you have successfully added the email account, Gmail will send you a verification email with a confirmation code AND a link to click on. Both “confirm” your account, but you just need to pick one to complete. I find it easier at this step to just close this pop up and open the email that will be in your inbox.
*If there is no email, wait just a second. If after a bit there is still no email, you may need to ensure your domain email forwarding with your hosting provider is working properly. My verification email appeared immediately.
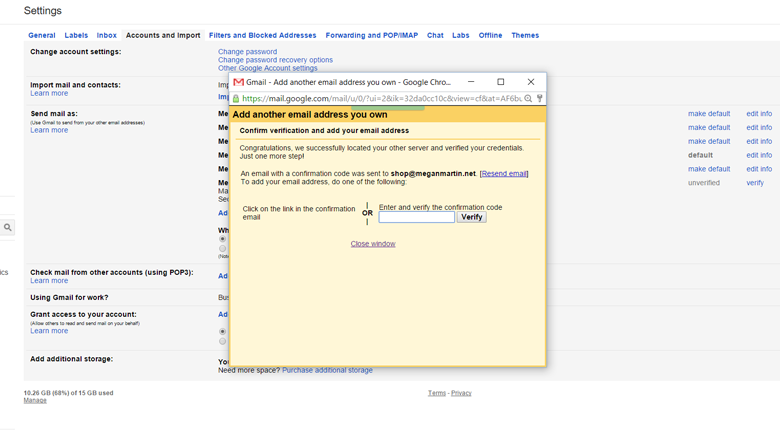
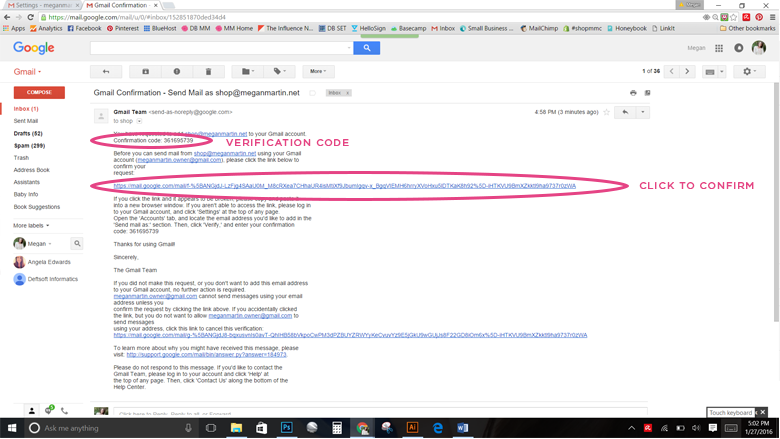
Step 6 – Enter your code or click on the confirmation link in the email sent from Gmail. If you click the link, you will be directed to a new window that will ask you to click on the “Confirm” button. Do so and you are all set to go!!!
Step 7 – Throw confetti! You did something great for your biz professionalism!
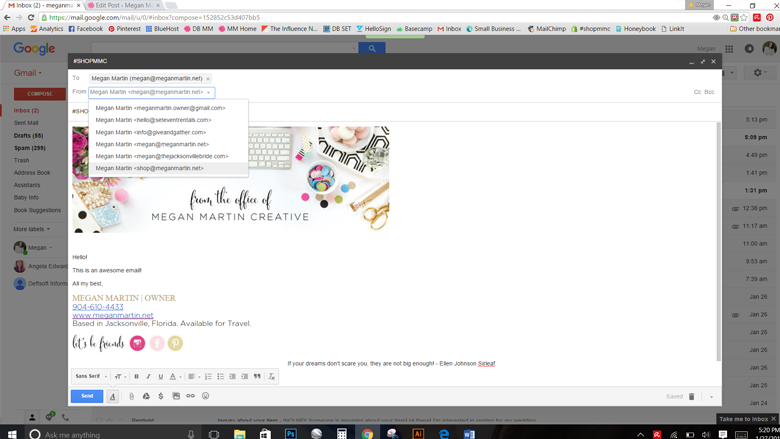
To Send an Email using your new alias – After you have successfully added your new email alias (you will know if this has been done by checking back in your Settings under “Accounts and Import”), it is time to start emailing with your fancy new digs. If you want to always reply to emails from this new address as a default, while you are in “Accounts and Import” go ahead and click on “make default” next to your new email account address. Then under “When replying to a message:” choose “Always reply from default address.” *This step will help ensure your personal email won’t be seen in your replies!
Whatever address you set as the default will also be the address used to send all new emails by default. If you have multiple accounts and need to write an email from a specific address other than your default, click “Compose.” The new email pop up will appear. To change what address you are sending from, click the down arrow under the “From” field. A drop down will appear and show you all the available aliases you have set up to send from.
That is it my friend! Send away in snazzy style all from your free Gmail account! I have heard many business friends who love using Gmail Apps that allows you to link your biz email, but there is a monthly fee associated with that service. I am all about being frugal so a handful of steps to make this happen was worth it to me!
Did you make it happen? Comment below and let’s celebrate!

YES! Thank you SO much! I have been struggling with figuring this out, this helped a ton!
Oh good to hear! So glad I could help!
THANK YOU SO MUCH! This is so so so helpful! I was about to go dishing out money for Google Apps to have the professional email, I had no idea you could get one for free. So awesome!
Yay! So welcome! I love to save those pennies, too!
[…] For a detailed how to on forwarding a domain email address and using Gmail as an alias, see this post! […]
[…] Video Mentioned Links: SC Stockshop for high-quality stock images to use for your branding. For a detailed how to on forwarding a domain email address and using Gmail as an alias, see this post! […]